Saturday 27 November 2010

Beastmen vs Bretonnia Battle (Maps) 1500 pts

Argentbadger kindly posted a link to one of his battle reports through my 7th edition warhammer fantasy battle reports hub. This battle is actually 8th edition so I'm adding it to this site (that Argentbadger wouldn't have known about at the time because I hadn't advertised it's existence).


"The gors roll poorly in their attempt to charge the Grail Knights, condemning them to an inevitable fate as a kebab on a Bretonnian lance."

I understand Argentbadger has just picked up 8th edition after a 10 year break (although he was still blasting away with bolters and lasers in Warhammer 40k). He runs a very tidy blog and has added a few other excellent reports which are all Beastmen vs..., if you're of a bestial nature then you should check them out.

source : http://thebovineoverlord.wordpress.com credit : Argentbadger27-Nov-2010

Aramoro and I managed to have another game of Warhammer last week. His Bretonnians put my army to shame since he has a load of lovely painted knights from his previous foray into the game, a bit more than 10 years ago. If my Beastmen looked like Aramoro’s Bretonnians, I might have taken some photos. But as it is, the sight of glorious heraldic knights crashing into cardboard unit footprints is less spectacular. Anyway, at Aramoro’s request we moved up to 1500 points, which I soon found out was to allow him a more expensive Lord character.

The Beastmen Army

  • Beastlord, talisman of preservation, sword of strife, heavy armour, shield
  • Wargor, BSB, talisman of endurance, heavy armour, shield
  • Bray shaman, level 2, additional hand weapon (Lore of Beasts)
  • Bray shaman, level 2, additional hand weapon (Lore of Beasts)
  • 20 Gors,shields, full command
  • 20 Ungors, full command
  • 12 Gors, additional hand weapon, full command
  • Tuskgor chariot
  • Tuskgor chariot
  • 9 Ungor raiders
  • 18 Bestigors, full command, banner of eternal flame

The Bretonnians' Army

  • Aramoro went for (approximately)
  • Green Knight
  • Paladin, BSB, warhorse, lance
  • Damsel, level 2, dispel scroll, horse (Lore of Beasts)
  • Damsel, level 2 (Lore of Life)
  • 9 Knights of the Realm, full command
  • 15 Men at Arms, full command
  • 9 Grail Knights, full command
  • 3 Pegasus Knights, musician, standard bearer


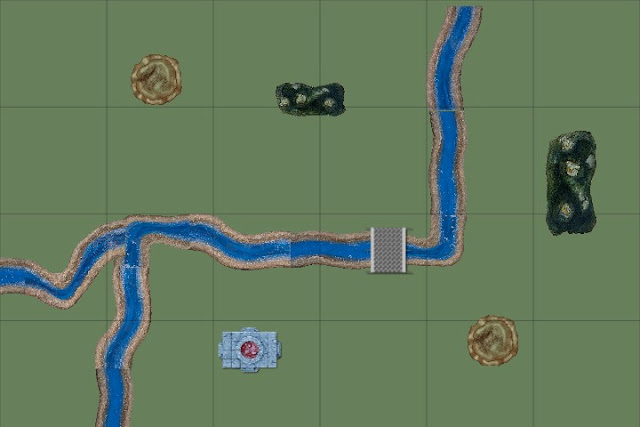
The mounted Damsel is the Bretonnian general, because the Green Knight can’t lead, and neither can the BSB. Rolling for spells, both Bray Shamans took Wyssan’s Wildform, one getting Amber Spear and the other Transformation of Kadon. The mounted Damsel also took Wyssan’s Wildform and Amber Spear, the one using Longshank’s pony got Earthblood and Dwellers Below. Once again, we just took a bunch of the terrain that was spare from Forkbanger and Gary pounding each other at 40K, set it up to look cool and then rolled for the appropriate parts. We decided that the river would be different on either side of the bridge.

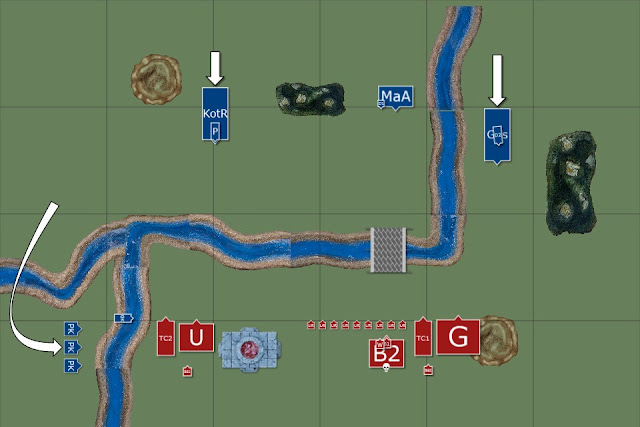
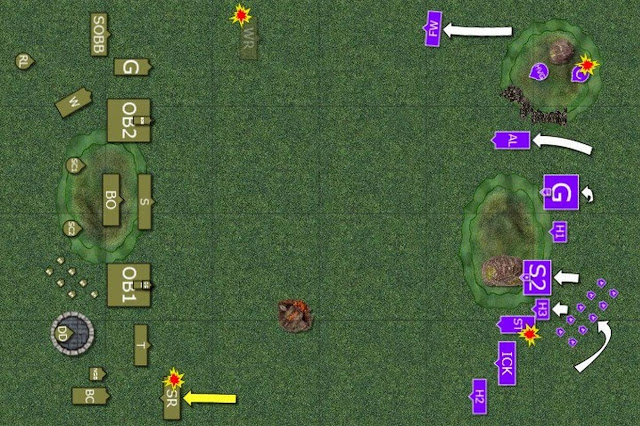
beastmen vs brets battle terrain

The temple was a Temple of Khaine (causes frenzy) which caused no end of problems as we continually forgot about the extra attacks and that frenzied models can’t use shields. The North-most swamp was a mist-wreathed swamp (or a Fimir-rape swamp as Forkbanger calls it, for aficionados of very old fluff), the Eastern one was an Earthblood mere. Somewhat disappointingly, both hills were just normal. We get the Blood and Glory mission (break points, which was 2) and duly set up. This picture shows the scene after the Pegasus Knights have made their vanguard move.


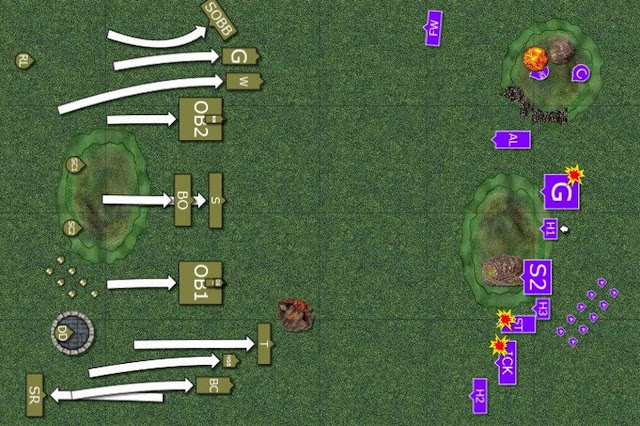
The Bretonnians take the first turn. The Pegasus Knights zoom forward as fast as they can, and the Green Knight appears out of the river on the flank of the ungors. Everyone else just shuffles a bit to set up thundering charges next turn. Magic is very effective, with a Dwellers Below going off on the Bestigors. A few of the horny beasts are dragged to some unspeakable doom (although surely not as bad as the one potentially awaiting in a mist-wreathed swamp), and the BSB is sucked down too. Ouch!

Bretonnia battle turn 1

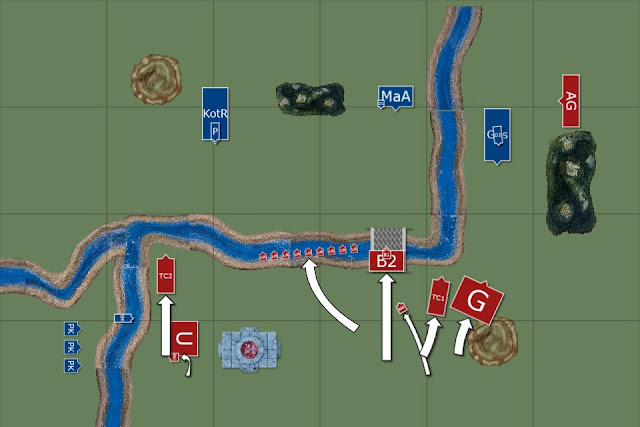
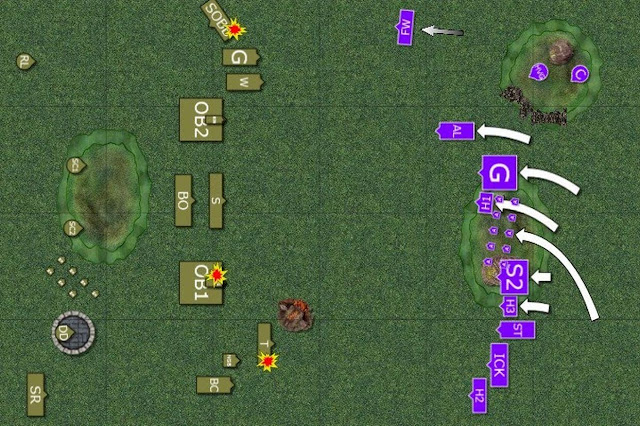
The beastmen respond by moving most units forward, realising that they’re not likely to be doing much charging anyway. The ungors fail to swift reform, so they just turn to avoid being flanked by the Green Knight and the Pegasus riders. The Bray Shaman behind them joins the unit, although I’m not really sure what difference it was likely to make. The raiders move into the river, which turns out to be a river of Light. Even though almost the whole Lore is made up of augment spells, they manage to roll Net of Amyntok, which will do a lot of damage if they move. Not surprisingly, they stay put. Finally, the ambushers appear on the right flank (as a side note, I have been really lucky with ambushing – in every game I’ve played they’ve arrived on turn one, and never on my own table edge). The Bray Shaman on the left puts Wyssan’s Wildform on the ungors he just joined which I hope might help out a bit against all those armoured maniacs over the river.

Beastmen vs Bretonnians turn 1 pic

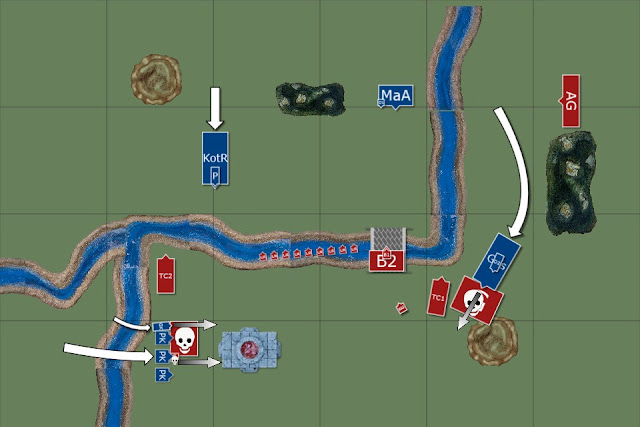
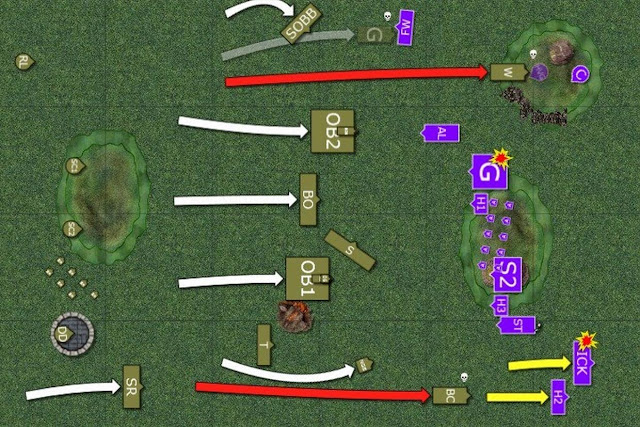
This is where it gets messy; you should look away for a few turns if you like Beastmen. The Pegasus Knights and the Green Knight charge the ungors (the Green Knight gets Light of Battle from the river, which is useless since he already automatically passes leadership checks), nuking them for the loss of two of the Pegasi and overrunning toward the Temple of Khaine. The Grail Knights do pretty much the same to the gors on the right, except that they don’t even take a casualty in return. The only light for the Beastmen is that the Knights of the Realm fail a charge on the raiders. This is a part where I’m not really sure if we did it right. The chard only failed because of the way skirmishers rank up when receiving a charge (i.e. the charge would have hit if the raiders hadn’t all huddled around the middle guy). Also, since they had Net of Amyntok on them, it might be that they should have taken a load of hits when they ranked up, and then some more when they returned to skirmishing formation. Anyway, we didn’t make them take hits.

Bretonnia battle turn 2 image

The surviving goat people try to get even. Most of the units shuffle to try and get out of the charge arcs of the knights sweeping all before them. The chariot on the left charges the Knights of the Realm, and does at least manage to kill a couple of them before they beat it senseless and run it into the ground. I’m still a bit disappointed in its performance though. The Bestigors and Beastlord (who I should probably name, but I’ll wait until he gets a model first) crash into the men at arms, smite them mightily and then laugh (or bleat) in triumph as a couple of survivors flee the field, taking the Damsel with them. Incidentally, the Damsel on foot was represented by a miniature of a fat guy with a keg of beer, not very lady-like. The Bestigors reform to face back toward their own table edge.


In turn 3 for both armies, there isn’t much more than a bit of milling around. Both the Pegasus Knights and the Green Knight try to charge the surviving chariot, which sensibly flees, rallying only long enough to find itself right in front of some grim-looking (but brightly coloured) Grail Knights. Otherwise, the only event of note is the Bray Shaman killing 3 Grail Knights with an Amber Spear. Over 3 consecutive turns, he successfully cast it 3 times, and only once did it even hurt the first knight. All 3 times were irresistable force, and he actually survived due to lucky rolls on the miscast chart (and more importantly because we forgot to roll at all the first time).


The Grail Knights charge the newly rallied chariot, which flees again, leaving them standing around in (possible) charge range of the gors. The Knights of the Realm have another go at charging the raiders. This time they succeed and annihilate the little blighters, but the overrun puts them right in front of the Bestigors. The Green Knight uses his magic powers to walk into the river and reappear in another part of the river. Slightly boringly, this turns out to also be a river of Light (so it was all part of the same river after all), and once again he gets Light of Battle, which is useless to him. The Pegasus Knight turns to face the Bray Shaman who has been trying to stay out of his charge arc for a few turns.


The gors roll poorly in their attempt to charge the Grail Knights, condemning them to an inevitable fate as a kebab on a Bretonnian lance. The Bestigors have no such troubles, splattering almost all of the Knights of the Realm. The Beastlord issues a challenge, and duly smites the Knight champion (though I was hoping for a more heroic shot at the Paladin). A couple of survivors flee off the board (they also lose the BSB and standard bearer when fleeing). The Bestigors despoil the remains and then reform to face the Green Knight who is looming behind them.


The Green Knight charges the Bestigors, and will spend a few combat phases enduring a rather limp slap-fest in a challenge with the Beastlord and taking wounds from combat resolution. In fact, if I had remembered about the Despoilers rule (which allows them to use captured standards) the supernatural knight would have evaporated in the first turn. Oh well, we live and learn. The Grail Knights have no such problems, crashing into the gors, pulverising them and making the last few flee in hot pursuit of the chariot. Finally, the Pegasus Knight hits the Bray Shaman, fails to wound, saves all the return attacks, and presumably sighs and throws his lance aside.


The Beastmen turn is fairly dull. The Bray Shaman is killed off by the Pegasus Knight, and the Beastlord and Green Knight trade blows to minimal effect. Everyone else keeps on running.


The Grail Knights move toward the Green Knight so that they can (and do) put Wyssan’s Wildform on him. It doesn’t help, and he loses his last wound to combat resolution. The Pegasus Knight inexplicably doesn’t move a long way away from the bestigors, which will cost him dearly very soon.


The Bestigors charge the Pegasus Knight and grind his bones to make their bread, then the game ends.


So, for those keeping count, neither side reached their Breaking Point: the Bretonnians still had 3 (their General and the Grail Knight banner) and so did the Beastmen (their General and the Bestigor banner). We didn’t bother adding up victory points, figuring that the survivors would be about the same value. So it was a glorious draw! I’m not sure what a draw means in fluff terms. Maybe the Bretonnians stop the Beastmen pillaging a large village, but they ransack a few hamlets instead?

What a nice game. I felt like I was getting a sound thrashing on the first couple of turns, with magic taking out my BSB and lance charges wiping out my units, but I was glad to pull it back and give Aramoro a bit of a challenge (especially since I don’t think he’s actually lost a game of Warhammer since we started playing again).

I rather enjoyed the Bestigors, especially if I ever remember to use the Despoilers rule. I definitely felt that they were more effective than the minotaurs that I thought of them as being comparable to. I think that maybe I would have been better with fewer magic items and more hooves on the field, but magic items (and magic in general) are cool. We’ll see what I feel like next time I make a list up.

Saturday 13 November 2010

Bretonnia v Dark Elves VIDEO Battle

A very detailed 8th edition Warhammer Fantasy Battle report - VIDEO

Dark Elves vs Bretonnia battle report
Lots of description of the battle and the reasoning behind tactical decisions. There are also a few insights into the impact of some of the 8th edition rule changes on Bretonnians and Dark Elves.

Sigmar: I think there's a lesson to be learned here (as the narrator points out)... if you spend a lot of points on a key unit then try to make sure it's in the thick of the fighting (a mistake I keep making too). 


Oh and something else... Trebuchets are great :)


credit : OnceBitten36013-Nov-2010 7:35 mins + 10:15 mins 

Bretonnians vs Dark Elves 2400 pts - Part I


Bretonnia vs Dark Elves 2400 pts - Part II

Saturday 6 November 2010

Orcs and Goblins vs Empire 2250 pts (maps)

A very one-sided Fantasy Battle massacre - I've tried to find a Warhammer lesson here but... I'm not sure where it all went wrong for one player. It's all over by turn 4 !


"The Volleygun empties all their pipes into the Wolf Riders and wipes them off the field. In the south, the Handgunners take out three Spiders and sends them fleeing back to whence they came from. " [Sigmar: Ouch, not a good start !]

BTW, I got the report with permission from Trollhoer's blog which is well worth a visit. It has a nice, tidy layout, very personalized content (it's a personal Hammering record) and is thus a pleasure to visit.

source : http://trollhoer.blogspot.com credit : trollhoer06-Nov-2010

I fought my first 8th edition battle last week against one of the store managers. As it was scheduled in a hurry, we decided to play with our fairly recent tournament lists at 2250 points, with minimum changes that took about 10 minutes of rule book browsing to make. I thought this would be a good way of trying out the new edition; use what did work in the last edition and evaluate how they do in the next one, rather than make changes directly from theoryhammering.

The narrative would have the Empire forces of Ostermark defend their land against a Waaagh! from the World's Edge Mountains. The scenario was to be "The Battle for the Pass".

The Empire Army

Arch Lector on War Altar
Captain BSB
Battle Wizard
Level 2
Warrior Priest

20 Swordsmen
Full Command
6 Halberdiers
Detachment
10 Handgunners
Marksman, HLR
10 Archers
7 Knights
Standard bearer, Musician
24 Great Swords
Full Command
6 Halberdiers
Detachment
Great Canon
10 Flagellants
Hellblaster Volleygun
Steamtank

The Orcs & Goblins army

Black Orc Warboss
Boar, Heavy Armor, Enchanted Shield, Akkrit Axe, Kickin' Boots, Best Boss 'At
Black Orc Big Boss
BSB, Boar, Heavy Armor, Spirit Totem
Orc Shaman
level 2, Dispel Scroll
Night Goblin Big Boss
Shield of Ptolos, Martog's Best Basha

2x 25 Orc Boyz
Shields, Full Command
Wolf Riders and Spider Riders
Spears, Musician
4 Snotlings

12 Black Orcs
Shields, Banner of Butchery
5 Savage Orc Boar Boyz
Spears, Shields, Musician
Orc Boar Chariot
Goblin Wolf Chariot
2x Goblin Spear Chukka
Goblin Rock Lobber

Goblin Doom Diver
Giant
3 Trolls


Deployment
The scenario "Battle for the Pass" has each army set up on the short table edges, while the long table edges count as impassable terrain. There were plenty of hills for both forces to deploy their artillery, while in the middle but to the south there were rumors of a magical fountain that could make the drinker unbreakable.

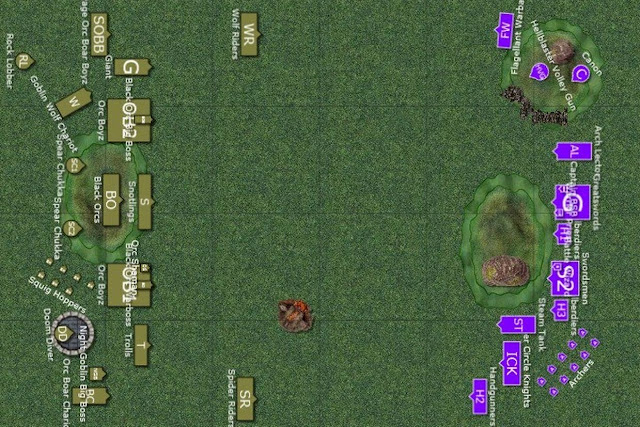
The Waaagh! placed each of their units of Orc Boyz on the sides of the large hill to the west, on which the Black Orcs deployed with Snotlings in front of them. Da Fast Stuff went on each flank.

Meanwhile, the Empire Army placed shooters and artillery in both the southern and the northern side of the eastern pass, while the Archlector and the Knights took up defensive positions on each flank. The troops went in the middle, hidden behind the hilltop.

The Orc Shaman is granted a Headbutt and a Warpath spell, while the Empire Wizard takes a few fire spells that would prove ineffective throughout the game. Unless stated otherwise, the Winds of Magic were not kind to either of the wizards for this battle.

Vanguard move start us out, with both spider riders and wolf riders scouting ahead in search of enemies with missile weapons that they can hunt down.

warhammer fantasy battle maps


Turn 1 - The Empire
Flagellants march forward, eager to martyr themselves in battle on the northern flank while the rest of the army hang back, trusting in their artillery to soften the enemy up.

The Canon and the Steamtank take aim on each of the Black Orcs on boars, but some snotnosed goblin must have dampened the gun powder and so they both misfire. The Volleygun empties all their pipes into the Wolf Riders and wipes them off the field. In the south, the Handgunners take out three Spiders and sends them fleeing back to whence they came from.

warhammer fantasy battle maps


Turn 1 - Orcs & Goblins
The Squig Hoppers start squabbling behind the hill, while the rest of the army moves forward. The Trolls start drinking eagerly from the magical fountain, but turns out the water is poisoned! This would halt their progress for a turn while they throw up (an experience they probably enjoyed, all things considered).

The Orc Shaman manages to call for a Warpath and Gork stomps all over the canon in the north, inflicting two wounds. The Empire Wizard invokes a magical item which forces the Shaman to re-roll all the dice he used for the spell and for each 5 or 6 he takes a hit (or a wound, not sure). Mork is with him, however, and he survives with one wound remaining.

The Doom Diver takes out two of the Knights, the Spear Chukkas puts a dent or two on the Steamtank, while the Rock Lobber drops a stone on the Greatswords, killing a few.

warhammer fantasy battle maps


Turn 2 - The Empire
The Flagellants, eager to meet their doom, charges the Giant but comes up short. The Archers move up around the Swordsmen to get a better view.

The canon still malfunctions, and the Steamtank misfires for a second turn and causes more damage to the hull. Meanwhile, the Volleygun takes out a Savage Orc Boar Boy, while in the south the trolls suffer a wound from missile fire. To add insult to an already miserable Orc Shaman, the Markman among the Handgunners takes out the Hochland long rifle and puts the shaman out of his misery.

warhammer fantasy battle maps


Turn 2 - Orcs & Goblins
In the north, the Giant charges into Flagellants and reaches them without trouble. The Wolf Chariot charges an impressive 21" and hits the Volleygun. In the south, the Boar Chariot charges into the Handgunners, who stand and shoot but fails to wound it.

The Doom Diver takes out most of the Knights, who fails their panic test and flees to the east. The Lobba continues to bombarde the Greatsword with rocks while the Chukkas pick their noses.

The Wolf Chariot kills the Volleygun crew and overruns into the Canon, while the Boar Chariot takes out half the unit of Handgunners and sends them running. Instead of pursuing, the crew decides to reform and turn the chariot to the left to threaten the forces north of it. Unfortunately, things aren't going as well for the giant, since the Flagellants get to strike back after his club swing and with Sigmar's aid inflicts nine wounds on the big fellow, killing him outright.

warhammer fantasy battle maps


Turn 3 - The Empire
Set in my 7th edition ways, I had placed my center units safely away from the 8" infantry charge range, which of course would cost me in my first 8th edition game. The Greatswords have no problem charging alongside the War Altar straight into the Orc Boyz led by the BSB. Even more upsetting, the Swordsmen charges almost cavalry-like and hits the Black Orcs in the center. Unfortunately, their attachment can't find room. Unsure how to settle it, I allow them to instead charge the snotlings. What remains of the Flagellants eagerly charges to their death against the Savage Orcs. In the south, the Handgunners continue running, but in this edition they apparently run away from the nearest enemy, which is the Boar Chariot so they are still on the field. The few remaining knights manages to rally.

In combat, the Flagellants take out a Boar before they all meet their end. The War Altar and the Archlector does very little, but the Greatswords, spurred on by the eager Warrior Priest, kills more Orcs than the BSB manages to keep in line. Luckily, their flee roll shows a double 6, which is too far for any of their pursuers to match, and the Greatsword detachment overruns to join the Swordsmen against the Black Orcs.

To no avail, as even though they take out 3 of the brutes, the Black Orcs unveil the Banner of Butchery, grabs plenty of their choppas, and proceeds to chop up 11 Swordsmen, putting them on even ranks (none for either). The Swordsmen fail to find their insane courage, breaks and are chased down by the Black Orcs.

The impact hits of the Wolf Chariot takes out the Canon crew, and the chariot reforms to face the center.

warhammer fantasy battle maps


Turn 3 - Orcs & Goblins
In the north, the Wolf Chariot charges into the War Altar, hoping to at least keep it occupied for a turn, while the Boar Chariot charges after the Handgunners and catches them. The Trolls, finally done throwing up, charges into what remains of the Steamtank. Sadly for the Savage Orcs Boar Boyz, I forget to declare their charge (even though I rolled to pass their leadership test, doh!) and they're forced to move into a better position for next turn instead. Close to the hill, the broken Orcs manage to rally.

The Doom Diver kills off the remaining two knights and the Rock Lobber rolls a direct hit and takes out half of what remains of the Great Swords.

In combat, the Trolls start smashing the Steamtank, which is below half its original wounds and won't return much carnage. Meanwhile, the Detachment finally goes through the snotlings with only three soldiers still standing, who charge into the rear of the Warboss' unit of Orcs. The Wolf Chariot takes a wound of the War Altar and pins it while waiting for backup to arrive.

warhammer fantasy battle maps


Turn 4 - The Empire
Finding themselves right in the middle of so many bloodthirsty Orcs, the Greatswords spots a way out by charging the Squig Hoppers, who had squabbled for two turns and now foolishly had hopped in to join the carnage.

The Archers on the hill spots a Big Boss on a Giant Squig hopping their way and unleashes a salvo straight at it. The Boss reveals the Shield of Ptolos that grants +1 armor save against missiles much to dismay of the Empire hunters.

In battle, the Trolls finally destroy the Steamtank, while the battle between the Wolf Chariot and the Archlector comes to a draw and what's left of the detachment dies at the hands of the Warboss who moves back in the lines to do some chopping. The Squig Hoppers are cut down, but not before bringing the Greatswords and their heroes down to less than a full rank. Even though the soldiers manages to overrun, out of sight from most of the Horde, things are certainly looking grim for the Empire.

warhammer fantasy battle maps


Turn 4 - Orcs & Goblins
And things would turn even worse, when the Squig Hopping Boss hits the Archers who can do nothing but hold, and the War Altar is sandwiched between Black Orcs from the south and Savage Orc Boar Boyz from the north. Meanwhile, the Orc Boyz reform to go after what remains of the Great Swords.

It would prove unneccessary, as the Chukkas and the Doom Diver finds their mark and wipes out the few soldiers still standing. That spells the end of the Empire force as they are wiped out on turn 4, giving the Waaagh! their first victory in the 8th edition. Surely they were bolstered by the spirit of Gork (or possibly Mork).

warhammer fantasy battle maps